Tuesday, May 22, 2012

Stinky, delicous, cheese.

Oh my. It's been a realllyyyy long time since my last blog! Unfortunately, it will probably be like that for the next year :( Although I have a bajillion things to get done in the next year-ish, I will try to sneak in some blogs when I can....like now...as I begin my blog at 12:15am. Who needs sleep anyways, right?

Anyways, so since my last blog, a lot of stuff has happened! I'm not going to go into details...but the 2nd best thing that has happened: a visit from my aunt from France...and my cousin, also French, who traveled from the Netherlands. So, I really love seeing my family from France as I don't see them very much. But, what I love equally...the food they bring back for me! When I hear my aunt is about to visit...the first thing I think about is the glorious cheese that will stink up of my refrigerator. And this is exactly what is going on as we speak. One of the cheeses that is currently stinking up my fridge is "Crottin de Chavignol" - a cheese made of goat's milk, and, according to my mom, smells like BO. Lol. She really said that. Despite the BO smell, the cheese is delicious, delicate, smooth, nutty, and perfectly pungent..not too overpowering. Surprising, given it's distinct odor. Anyways, so my aunt told me exactly how to eat this cheese and I thought I'd share it with you all! Straight from Paris! Plus, it's super simple, has ingredients everyone probably has on hand, and takes only about 15 minutes. Who needs to travel to France when you can do this at home! Actually, we should all really should go to France...but, maybe someday when I have a job...like a real one...

Apple and Crottin de Chavignol

What you need:
1 loaf of really good bread (I picked up a loaf of Italian Stretch from "Pan Chancho's", my fave bakery in Kingston)
Crottin de Chavignol Cheese...although, I'm not sure where to get this from in Canada...
A couple slices of any kind of apple (I think I'm going to try pear next time)
Extra Virgin Olive Oil

Zoom in on the cheese...oh how I wish you could scratch and sniff this....
  
So, the whole process is pretty simple and straightforward...
1) Place the apple slices on the bread
2) Crumble the cheese over top
3) Drizzle some extra virgin olive oil


4) Bake at 400oC for about 10 mins...just until the cheese becomes soft and bread is toasted....and you end up with:
 
 5) Enjoy!

The French reallly know how to eat...I've discovered this during my food adventure in Chicago, which I will be blogging eventually because people really should know about the amazing restaurants that exist there. But, that will have to wait. Until next time...and you probably have plenty of time until my next blog...try this recipe!

Bon appetit!

ninja.

Sunday, April 22, 2012

Healthy Chocolate Brownies!

I know, I know...I was all excited about blogging, then was M.I.A. for like a month! A week after starting this blog I got a bit busy preparing to leave for Chicago for a conference, spent about a week at the conference, and was busy getting my life back together the week after. And I guess that fourth week...I just didn't cook anything really exciting! But, I will be blogging about my Chicago adventures soon since all the food I had was absolutely incredible.
Anywho, we'll save Chicago for later and start blogging about chocolate now! So, I have been having my normal chocolate cravings lately and coincidentally also received an email from Jillian Michaels about how to satisfy those chocolate cravings! I have never tried baking a 'healthy' dessert...because...it's dessert and it's supposed to be unhealthy! But, I thought I'd give this one a shot. And it turned out pretty good! Although, I'm not sure I'd categorize them as 'brownies'. They turned out more cake-y and less fudge-y. And I can really taste the honey (probably the kind I used...Naturoney Organic Honey)...it's almost like a chocolate honey cake! Nonetheless, it still did a good job at satisfying my chocolate craving...I just scarfed down 3 pieces! So, really, they're probably not healthy when you can't control yourself...
I would definitely make this one again. Not only is it 'healthy'... but, it's super quick and easy to make...and you only really need 3 bowls, which makes for easy cleanup. Here's how I did it!

Jillian Michaels' Fudge Brownies

Bowl #1:
2/3 cup honey - microwave for 1 min until runny
Then add 1/3 cup unsweetened cocoa. Mix well and set aside to cool.


Bowl #2:
Sift together:
1/2 cup flour (I didn't have whole wheat)
1/4 tsp baking powder
1/4 tsp baking soda
1/4 tsp salt


In a mixer add:
1/2 cup unsweetened apple sauce
2 tbsp olive oil
1 egg at room temperature
3/4 tsp vanilla


 Mix the ingredients in the mixer.....

 Then add in the cooled honey/cocoa mix (this was still slightly warm when I used it)...

And lastly, the dry ingredients....

And when everything is all mixed in the party...transfer to a greased baking dish...into a 350 C oven..

... 25 minutes later...
Chocolate deliciousness! 


Yum!

ninja.

Saturday, March 24, 2012

Thai Red Curry with Coconut Brown Rice

Wow, I don't think this Saturday can get any more productive than it has already been.  1) Did science. 2) Cleaned the apartment. 3) Grocery shopped. 4) Currently, editing a proof of a manuscript that my boss told me that he needs edits back in 48 hours. Yes, this was on a Friday, so more weekend work (yay!). But, of course, I am deciding to procrastinate and post a new blog on my Thai Red Curry with Coconut Brown Rice! (this is clearly more important than work sometimes...or all the time). 
Anyways, so I've been totally wanting to try to make some coconut rice for a while now and thought I'd give it a shot...plus, the pairing with some red curry can't be beat! Unfortunately for the rice....turned out more like a coconut risotto that was bland...so, I'd have to reduce the amount of liquid next time, or not soak the rice for 2 hours (which is what I smartly decided to do according to some sites online). It was a bit mushy (okay, a lot of mushy) but, I added some shredded sweetened coconut and I must say, that has been the most genius thing I've thought about for some time now. The sweetness perfectly balanced out the spicy-ness of the curry and the coco-nutty-ness was certainly accentuated with the new addition. Delicious! (minus the mushy-ness....but I'll get around to fixing that some time...and when I do, I'll let you all know!) 

Coconut Brown Rice (http://thaifood.about.com/od/vegetarianthairecipes/r/browncoconutrice.htm)

1 1/2 cups brown rice
1 can coconut milk
2 cups water
1/2 tsp salt
*shredded sweetened coconut to taste

I kinda sorta followed the recipe on that link. But, as I mentioned (and certainly not recommend) I soaked the rice for a few hours beforehand. Then added the coconut milk, water, and salt. Brought it all to a boil, and then simmered with a cover on low for...a long time. I don't remember how long...but, probably about 45 mins.


So, it's quite the cooking process...but, you can make the red curry while you're waiting! Talk about efficiency!

I make the red curry quite often, so I just vary the ingredients depending on what I feel like. Really, about any vegetable can go in this and taste delicious. And it doesn't hurt to make it super colourful! Some veg you can think about adding (I generally use these in different combo's): baby corn, bamboo, bell peppers, sugar snap peas, eggplant, onions, mushrooms). And for the red curry, I think either shrimp or chicken thighs go best...but you could also add pork or beef if you wanted to. As per usual, these I provide rough amounts provided in the following recipe...

Thai Red Curry with Shrimp

2 1/2 tbsp red curry paste (I like Aroy-D brand...made in Thailand!)
1 can coconut milk (Aroy-D also recommended)
2-3 bell peppers
1/2 Italian eggplant (or 1 Chinese eggplant)
1 medium onion
1 pack of mushrooms (227g)
1/2 lb shrimp
2 kaffir lime leaves (optional...but, adds a really amazing and distinct flavour)
*cilantro (optional)
*fish sauce to taste (maybe about 1/2-1 tbsp)
*brown sugar (about 1 tbsp)
*Note: you can also adjust the curry paste...add more for more spice!


 So, I like to give everything a quick stir fry first. I put the onions and peppers first for a couple minutes...then the eggplant for a few more mins...and lastly, the mushrooms. Remove and transfer to a plate.
 

In the same pan, add some veg oil (about 1 tbsp) on med heat and then add the red curry paste until fragrant...about 3-5 mins. Then add half the can of coconut milk and mix in the paste well. 


 Then add the shrimp and kaffir lime leaves. Do not over cook the shrimp! Should take only a few mins. I actually undercooked the shrimp and took them out so I could finish cooking them just prior to eating (my rice wasn't quite close to done yet).


Then I added the veg and the rest of the coconut milk and simmered it for about 15 mins to extract everything I could outta those leaves and get the veg nice and flavourful. Add the fish sauce and brown sugar to taste sometime around this point. Just before serving I turned up the heat and added my shrimp for about 2-3 mins.


Voila!
Eat your heart out...Coconut Brown Rice with Thai Red Curry:


Thank god for procrastination. Now, I can work!

Enjoy!

DL.

Thursday, March 22, 2012

Stir-fried Buckwheat Noodles

As much as I like to cook, there are some days, like today, where I am just way to exhausted to even think about it. I mean, it is quite the process. First, you gotta think of something to make...then prepare everything you need...and cook...before finally scarfing everything down faster than it took to you to make it. And who could forget the wonderful clean up afterwards (well, for those of us who don't have a wonderful machine to do it for us).
Since I live downtown, it's pretty tempting to just grab take out on my way home on those busy days. Even today I was sooooooo close to picking up Five Guys on my way home. But then I realized I have just one week until I head out of town for about 9 days, where I will be doing A LOT of eating. And not just eating...but, a lot of eating out. So, I figure I make use of the time I have to cook at home before I go binge eating. What can I say, I have terrible self control of what I eat when I can't cook. Technically, yes, I could pick better menu options...and yeah I probably shouldn't over eat. But, really, I'm on vacation! Ok, actually, most of it is for work, but I still take it as an opportunity to savor the unique and specialty foods offered where ever it is I am going.
Anyways, back to the main topic. So, I skipped Five Guys and decided to raid my kitchen and see what I could whip up. It's nearing the end of the week, so I had like nothing fresh left, except some peppers. I also had some frozen shrimp and buckwheat noodles lying around, so I thought I'd make some Asian inspired stir-fried buckwheat noodles with shrimp and veggies! The good thing about this is that it literally took me under 30 mins to prep and cook everything - perfect for those "I don't feel like cooking" days! I pretty much just made up the recipe, so the amounts are pretty rough. But, you can add much any vegetable or meat you want and alter the oyster sauce, soy sauce, or sesame oil to taste. Also, some green onions would've been fantastic here...but, I didn't have any, and was way to lazy to walk across the street to get some.

Stir-Fried Buckwheat Noodles

2 bunches buckwheat noodles (cook according to directions ~6 mins)
2 bell peppers
1 small onion
3 cloves garlic (minced)
12 medium sized shrimp
1-2 tbs oyster sauce
1-2 tbs soy sauce
1-2 tsp sesame oil


To be super efficient, I start boiling water to cook the noodles as I prep the remaining ingredients so that they will be done about the same time.
Add some veg oil in the pan...get it nice and smoking hot. Then add the onions and cook for abut 4-5 mins until slightly browned. Then add the peppers for another 4-5 mins until browned. And for the last minute of cooking add the garlic and cook until fragrant (careful not to brown or burn the garlic). Transfer to a plate.


In the same pan, add some more veg oil until hot. Then add the shrimp and cook on the one side for about 1.5 mins. Then the other side for about 45 sec. Careful not to over cook them!


Remove the shrimp immediately and transfer to the plate containing the veggies.


The noodles should be ready by now. Drain and rinse the noodles with some cold water until the water runs clear. Add a touch of oil into the same pan. When hot, add the noodles and quickly toss. Then add the platter of veggies and shrimp along with the oyster and soy sauces. Toss to coat everything evenly. Taste...and add more oyster sauce or soy if needed. Turn off the heat and mix in the sesame oil well.


 And voila ! A delicious, quick, and easy dinner !


DL


Sunday, March 18, 2012

Chicken Bolognese

I guess this is going to be my first official recipe post! Andddd...twas a success!

So for the past, oh maybe six months, I have been on a terrible, terrible food trip. Even yesterday you could find me at a dessert bar eating a peanut butter chocolate brownie...with peanut butter chocolate ice cream...and hot fudge. So good!!!! But really, all I can think about is getting in shape for the summer since it's getting so fricken warm now. Not that it's a bad thing. I just hate running and love eating. So hibernation during the winter time is not so bad. But, as I said, it's getting warm....and to me warm means less clothing...which means I have to get in shape! So to start my new years resolution (yes, months late), I decided to make chicken bolognese! I pretty much had everything on hand, except the chicken, which I picked up of course. But, basically everything I needed is shown here:

Actually, I used two recipes to make this. The first was to make a marinara sauce, which I got from Ina Garten off the Food Network (http://www.foodnetwork.com/recipes/ina-garten/marinara-sauce-recipe/index.html). Didn't change much...but, also didn't measure anything. Pretty straight forward...but, I did simmer the sauce for about an hour to develop more flavour.

 Everything swimming in red wine...
Then add the tomatoes....
Bubble, bubble, bubble...
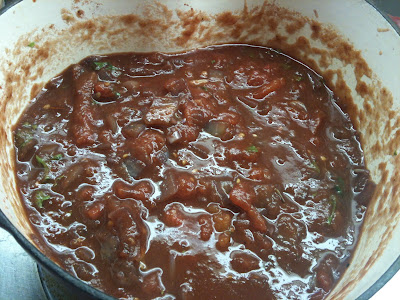
And done!

Now, onto the bolognese sauce from Michael Chiarello's website (http://www.napastyle.com/recipe/recipe.jsp?productId=2309&parentCategoryId=614&categoryId=721&subCategoryId=716).

Now, I managed to change quite a bit here. I eliminated the porcini (remember, I'm a student), substituted dried italian seasoning for the fresh thyme, used red instead of white wine (the red was in the marinara...thought I'd be consistent), eliminated chicken broth, substituted mozzarella for parmesan (it was either that or provolone, which I had on hand), and used all the marinara sauce from Ina's recipe (which was at least 3-4 cups). So, I guess basically, I managed to re-create my own recipe! And I must say, it turned out delicious!


 In goes the marinara...


Tada! The finished product:


Enjoy! I know I did.

DL

Welcome to The Scholastic Chef!

So, I guess I am starting this blog on sort of a whim. Literally, I woke up this morning, had breakfast in front of my computer and decided, "I'm going to start a blog"...and that's what I did. Of course, this has been on my mind for some time - or at least since watching Julie and Julia. However, I'm definitely not going to cook my way though any sort of cookbook. Rather, this blog is just a way to keep track of what I'm cooking and whether or not it was any of success...or complete utter failure...for anyone who really cares.

Now, speaking to my choice in blog title. So, The Scholastic Chef was born in about 5 minutes of deep thought. As I was filling in account details for this blogger business, it never occurred to me that I would have to choose a title then and there. At first I thought, "screw it, I'll think of something later", but that would've probably been the first and last of this blog. Then I figured I would come up with something that would define the blog itself, in addition to the blogger (aka me). In a nutshell, I am currently in my 5th year of graduate school (also my 9th year of post secondary education, but really who keeps track at this point?), hence, "Scholastic". And I love, Love, LOVE to cook, hence, the "Chef". Although, I know that technically I am no chef, but it sounds much better than "cook", right? Now, put it together and what do you get? Alas, The Scholastic Chef. Keeping this in mind, being a full-time student doesn't provide a surmountable income of any sort. So, most of what I will be cooking will contain everyday items that you can find in your pantry. And if you don't have it...screw it. Really, you don't need to follow recipes to the tee...you can omit/add some ingredients or use them in variable amounts...it's really up to your own taste buds. Just don't omit the base of something, like tomatoes for pasta sauce. That would be silly.

Anyways, I hope that this blog will somehow be useful in any way to anyone out there reading that shares my love for food. If not, maybe I can just re-name this blog to "The Scholastic" and blog about my research. Just kidding, I wouldn't actually do that to you ...or me.

DL.